For about 4 years ago I completely switched from Evolution to Neomutt for both private and business e-mail. E-mail is part of my daily workflow and in addition to the rest of my tooling on the Command Line, Neomutt was the only thing that was missing.
Although NeoMutt is very fast and intuitive, it can have a fairly steep learning curve in the beginning and setting it up consumes quite a bit of time.
To get you started quickly, I’ve created this step-by-step tutorial to configure NeoMutt from scratch on Linux.
Pre-installation (optional)#
For this tutorial I will install Ubuntu in a Docker container, but these steps also work for Linux distributions which are using apt as package manager, such as Debian or Linux Mint.
If you are looking for installation steps for another distribution, take a look at Neomutt Distributions for a complete list or instructions to build from source.
Setup a Docker container#
Make sure you have Docker installed. See the Docker website for more instructions. If you don’t want to use Docker, just skip to the next section.
Create a new Dockerfile with the following contents:
RUN apt update && apt install -y vim
FROM ubuntu:24.04
Build the image:
docker build . -t system83.org/muttdemo:1.0.0
And spin-up a container:
docker run -it --rm system83.org/muttdemo:1.0.0 /bin/bash
Neomutt installation#
Download and install neomutt with apt:
apt install neomutt
Create directory structure for the configuration#
By default NeoMutt will look in the ~/.config/neomutt directory for a file called neomuttrc.
Create the following directories, where $USER is your own username.
├─ /home                    DIR
├─── $USER                  DIR
├─── .config                DIR
├───── neomutt              DIR
├─────── accounts           DIR
├───────── account1.muttrc  FILE
├─────── neomuttrc          FILE
└─────── themes             DIR
mkdir -p ~/.config/neomutt/{accounts,themes}
cd ~/.config/neomutt
Create a configuration#
For our base configuration we only need 2 files:
- A global configuration,
neomuttrc. - Account configuration,
accounts/account1.muttrc.
Global configuration#
Create neomuttrc and add the following:
# Use 'account1' as default account at startup
source ~/.config/neomutt/accounts/account1.muttrc

#
# Global settings
#

# Sort on threads
set sort = "threads"

# Second, sort on date
set sort_aux = "last-date-received"

# Date format
set date_format = "%d-%m-%y %T"

# Use default index format
set index_format="%4C %Z %{%b %d} %-15.15L (%<l?%4l&%4c>) %s"

# Check every 5 minutes for new messages
set mail_check=5

# Send email in background (do not wait)
set sendmail_wait=-1

#
# Keybindings
#

# Manual fetch new mail with 'G'
bind index "G" imap-fetch-mail
Account configuration#
Create accounts/account1.muttrc and add the following. After that update the contents with your own information.
set realname="Firstname Lastname"
set my_server="mail.mailserver.nl"
set my_username="f.lastname@mailserver.nl"
set my_password='my-secret-plain-text-password'
#set my_password=`pass ls Email/account1`
set my_imap_port=993
set my_smtp_port=587

set from="$my_username"

set imap_user="$my_username"
set imap_pass="$my_password"
set folder="imaps://$my_server:$my_imap_port/"

set spoolfile="+INBOX"
set record="+Sent"
set postponed="+Drafts"
set trash="+Trash"

unmailboxes *
mailboxes $spoolfile $record $postponed $trash

set smtp_url="smtp://$my_username@$my_server:$my_smtp_port"
set smtp_pass="$my_password"
Starting NeoMutt#
With the new configuration in place it is time to test it. Start NeoMutt with neomutt.
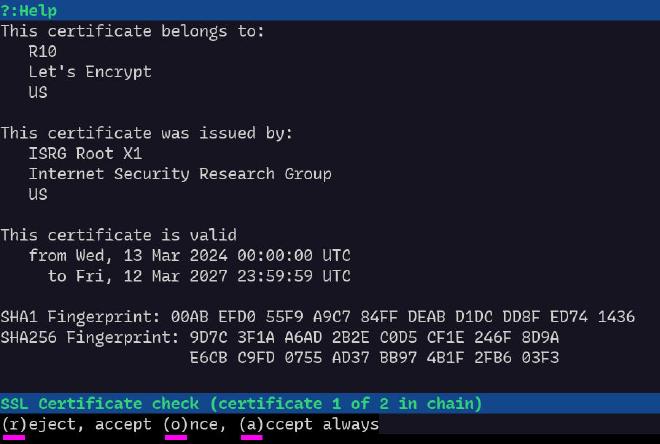
The first time NeoMutt launches it will display information about the server certificate. Choose a to always accept.

If everything went right, the Inbox is displayed.

Basic keys#
NeoMutt does have a built-in help screen where all shortcuts are being listed. To access this screen press ?.
| Key | Purpose |
|---|---|
| ? | Display help page |
| Enter | Opens a message |
| m | Compose a new message |
| r | Reply to a message |
| g | Forward message to all recipients |
| d | Mark message for deletion |
| / | Search |
| $ | Confirm changes, for example remove marked messages |
| q | Quit NeoMutt |
Send a new Email#
We are going to send a message to ourselves to test if the SMTP server is working.
- Press
m - Enter your own e-mailaddress
- Enter a subject
- Write a message (save and close the editor)
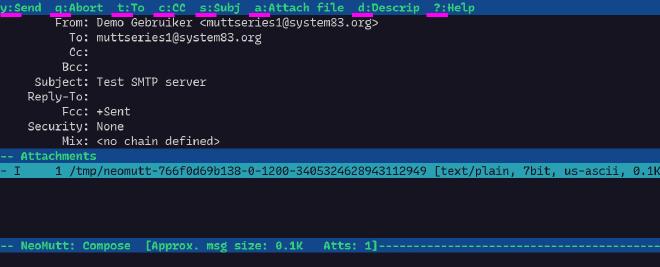
Now NeoMutt will show you a summary. Here you still can change the recipient, subject or add an attachment.
At the top of this screen you will find all the keybindings, or press ? to get the full help page.

- Press
yto send the message.
After sending the e-mail you will return to the inbox.
Fetching new Email#
NeoMutt will periodically check for new messages in the background. See neomuttrc to change the frequency. You can also press G to manually check for new messages.
Extras#
Adding a signature#
To automatically add your signature for every new message, create a new file accounts/account1.sig.
With kind regards,

The Mutt Demo User
Now update accounts/account.muttrc to include the signature:
set signature = "~/.config/neomutt/accounts/account1.sig"
Every time when a new message is composed, the signature will be added.

Look and feel#
Apply a theme#
The look and feel is not quite appealing yet, so let’s change that! Every color can be changed and there are some themes around you can apply.
If you found a theme just place it in ~/.config/neomutt/themes/theme1.muttrc after that you can include the new theme in neomuttrc.
source ~/.config/neomutt/themes/theme1.muttrc
Some examples of existing themes can be found here:
- Themes from NeoMutt.org
- Catppuccin / download Of course you can create your own theme, check this page to read more about color codes and how to apply them.
Index format#
The index format defines what your Inbox will be displayed. In our base configuration we already included the default format NeoMutt is using, which is:
set index_format="%4C %Z %{%b %d} %-15.15L (%<l?%4l&%4c>) %s"

It may look a bit cryptic, so i will try to explain what each setting means below.
| Parameter | Description |
|---|---|
%4C | Current message number |
%Z | Message flags. See to chars and crypt chars for more info about the flags. |
%b | File of original message folder |
%d | Date and time |
%-15.15L | Sender name or receiver if you are the sender. -15 reserves 15 characters space and .15 displays 15 characters. |
%<l?%4l&$4c> | If total linenumbers %l are available, display them. Otherwise the message size %4c in bytes. This is called a conditional |
%s | Subject of the message |
Example of a custom format:
set index_format="%4C | %Z [%d] %y %-20.20F %-30.30a %?M?(#%03M)&(%4l)? %?y?(%.20Y) ?%s"

In this example the real email address of the sender is displayed. The date format is changed to a Dutch format and some extra space is applied.
Check the full reference and adapt to your own preference.
Encrypt passwords#
To encrypt passwords it is possible to use an external program. This way you don’t have to save passwords plain-text in the configuration and thus keeping the configuration free from sensitive data.
For this we are going to use Password Store. This is a super neat tool which encrypts each password with GPG.
When NeoMutt is needing a password, it calls pass to fetch the password.
GPG#
First create a new GPG key, if you don’t already have one. See creating a key on debian.org for more information about GPG keys.
In short run gpg --full-generate-key to generate a new keypair.
Make sure to use the e-mail address you are using in NeoMutt if you want to sign and encrypt messages in future.
Password Store (pass)#
Password Store is a command line program to store passwords encrypted. And it does more then that. It is a directory based password vault, it can generate new passwords and there are plenty plugins available to integrate with for example your browser.
First, install pass with apt install pass. After the installation is done, you need to initialize a first password store. For this you do need your GPG KeyId.
gpg --list-keys

/root/.gnupg/pubring.kbx
------------------------
pub   ed25519 2024-12-04 [SC]
      FB67E860818F5B7231A46ABF28DB93A3C12DCE77
      ^^^       This is your GPG KeyId     ^^^

uid           [ultimate] Demo (Demo Key) muttseries1@system83.org
sub   cv25519 2024-12-04 [E]
Now create the password store with:
pass init FB67E860818F5B7231A46ABF28DB93A3C12DCE77
pass edit Email/account1
When editing a password your default editor is started. Fill in your existing password, save and close the editor.
Now to read your password, all you have to do is run pass Email/account1. The password is being decrypted and displayed on the command line. Remember this command, we also going to use this in the NeoMutt configuration.
Update NeoMutt configuration#
Open the accounts/account1.muttrc file and add the following change:
#set my_password='plain-text-password'
set my_password=`pass Email/account1`
From now on pass will be used to fetch the password.
Labels and filters#
Coming from Evolution i tagged messages with custom labels. This way i could quickly see the difference between TODO or DONE messages based on a color. Evolution also allowed me to apply filters based on these labels.
Filters#
By default NeoMutt has a lot of options to apply filters. By pressing the l key, a pattern can be entered.
For example if you only want to show all messages of the last 2 weeks:
Limit to messages matching: ~d <2w
Multiple filters also can be applied, so in this case: Display all messages that do not have the DONE label and are from the last 2 weeks.
Limit to messages matching: !(~y DONE) ~d <2w
To remove all filters, just press l again and enter all.
Now those filters also can be applied to delete messages. But be careful with that! Just press D, enter a filter and messages matching this pattern will be marked for deletion.
See the complete Patterns chapter for all pattern modifiers.
Labels and Macros#
In the last filter we used a label. To create those labels you can define a macro.
Add the following to neomuttrc.
macro index ,T "<edit-label>TODO<enter>" "Set X-Label to TODO"
macro index ,D "<edit-label>DONE<enter>" "Set X-Label to DONE"
macro index ,W "<edit-label>WAIT<enter>" "Set X-Label to WAI(TING)"
macro index ,I "<edit-label>IMPO<enter>" "Set X-Label to IMPO(RTANT)"
Now from the NeoMutt index you can press ,T to add the TODO label for the selected message. If you have applied the custom index format, the label is also displayed.
Sidebar#
A sidebar gives an overview of all directories NeoMutt is using. Personally i don’t use it, but it is available. Alternatively you can press c to change the folder, followed with a ? to display all folders available.
To enable a sidebar, add the following configuration to neomuttrc:
# Hide sidebar by default
set sidebar_visible = no
set sidebar_format = "%B%<F? [%F]>%* %<N?%N/>%S"
set mail_check_stats

# CTRL+P Scroll 1 item up
bind index,pager \CP sidebar-prev

# CTRL+N Scroll 1 item down
bind index,pager \CN sidebar-next

# CTRL+O Open selected folder
bind index,pager \CO sidebar-open

# Toggle visibility of sidebar
bind index,pager B sidebar-toggle-visible

Final words#
I hope you reached this point and have a working NeoMutt install right now. Of course this is only the beginning and there is a whole lot more to discover.
Thanks for reading, happy nerding en see you the next time!
